Iceboat nuts agree: when you increase the speed of your DN Iceboat,
there is a snowball effect on the amount of fun to be had during the chilly
winter season. If you want a faster, more enjoyable sail out of your DN,
it is very important to get the runner blades parallel to each other. Proper
alignment requires a little extra work, but can mean the difference between
first and second place in this season's DN iceboat races. Here's how we
do it in the icy Saginaw Valley.
Step 1
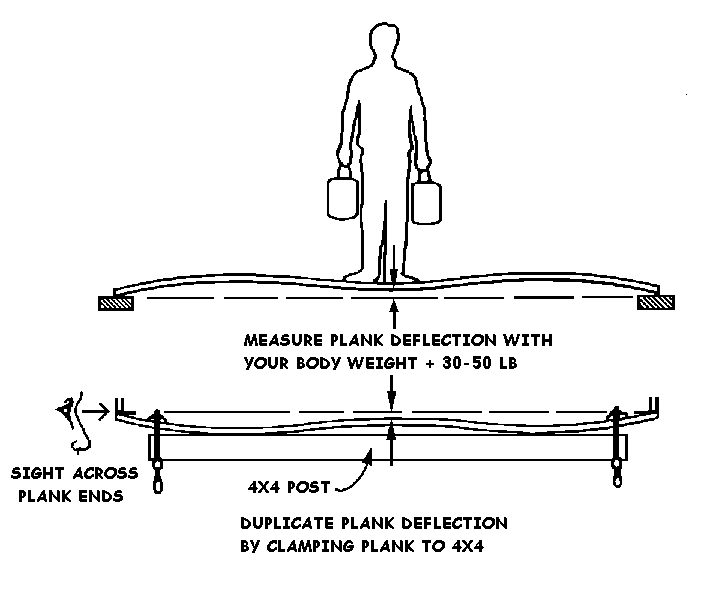
First, create a bend in the runner plank that simulates being on the starting
line in light wind. With the plank upright and the ends supported by small
wooden blocks, stand on your plank with 30 to 50 pounds of weight in your
arms. Note the amount of deflection in the plank by measuring the height
above the floor at the center and the ends of the plank. The runner chocks
will be mounted on the plank so that the runners will be perpendicular
to the ice in this position. Duplicate the bend by clamping the plank upside
down to a 7’ long 4" x 4" beam with "C" or bar clamps placed 6" from each
end of the plank. Draw the ends of the plank down until the bend is duplicated.
Sight across the ends of the plank to measure the amount of deflection
and assure that the ends are parallel to each other. |
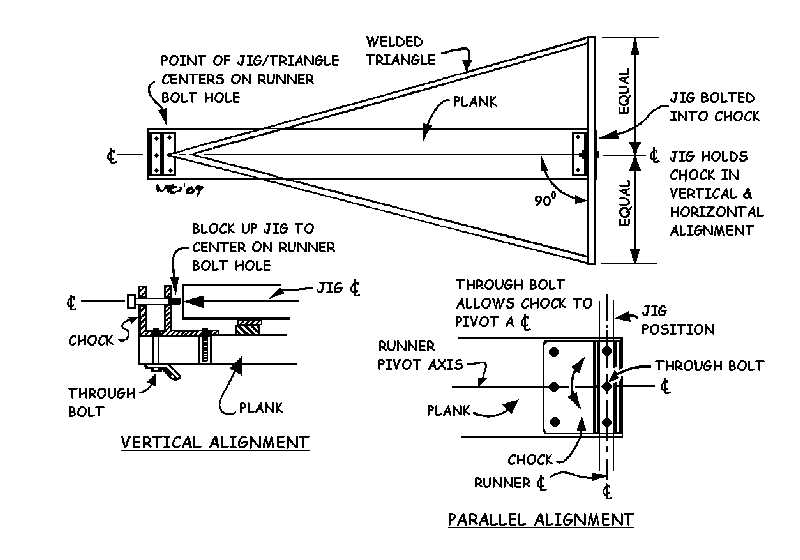
| There are different methods of lining up the chocks to make them parallel.
We use the triangle method. A jig, made of three pieces of 1" square steel
or aluminum tubing, is welded together in the shape of an equilateral triangle.
The base of the triangle (about 4' long), bolts into the runner chock.
(A 1" section will fit into the runner chock, just like a runner.) The
two equal length sides of the triangle (a little over 8’ long) should come
to a sharp point at the peak and almost touch the chock on the opposite
end of the plank. The point should fall on a centerline that bisects the
triangle equally, and is exactly perpendicular to the base. Drill a hole
through the middle of the base tube in line with the perpendicular centerline
for attachment to the chock. (Lay it out on the floor to get it perfect.)
Dry-fit the chocks in position. One through-bolt holds the tang for the shroud on top of the plank, passes through the plank, and then threads into the middle outer hole of the chock. One-inch Allen head set screws are threaded into the other five holes in the chock. The through-bolt hole in the runner plank is drilled to size. The holes for the set screws are drilled slightly deeper than the screw length, and oversized to allow for adjustment and better bonding. A 7/16" hole will do. The chock should be able to pivot slightly around the through-bolt. After the plank, jig and chocks have been prepared, wet out the holes and the surface of the plank under the area of one of the chocks with WEST SYSTEM epoxy. Follow with a generous amount of epoxy/406 Colloidal Silica mixture. Carefully place the chock on the plank end with the triangle-jig bolted firmly in place. Align the triangle point with the center of the runner bolt hole in the opposite chock. Shim the triangle point so that it rests with the center of the 1" tubing even with the center of the hole. |
| Epoxy should squeeze out everywhere. With the chock tightened down on the triangle, and the triangle end centered in both front and top view on the opposite runner bolt hole, the chock will be correctly positioned from both front and top views. Note that the inner edge of the chock may be slightly raised. Clean off excess epoxy, and allow the epoxy to cure thoroughly with the chock in this position. |
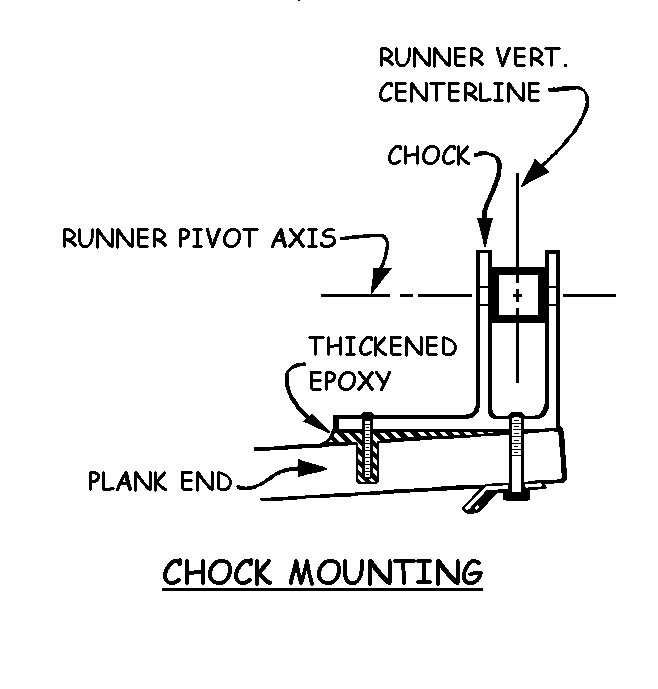
| After the epoxy cures, mount the other chock in the same manner and
allow to cure thoroughly before proceeding.
NOTE: Do not turn the aluminum triangle over. Mark the surface that
is up and always keep it up. This way, even if there is an error in the
triangle, the chocks will still be parallel to each other.
Step 2
Now that you have the chocks on the plank, the next step is to fine-tune
the runners. With the runner plank still clamped to the 4x4 with the same
deflection used to mount the chocks, bolt the runners firmly in the chocks
so their edges are parallel to the bottom of the chock. The runners should
also be parallel to each other. Put two marks on each runner, 6" fore and
aft of the runner bolt. Use a stick about 9' long and about 3/4" square
to measure the runner alignment. Lay the stick across both runners on the
aft mark. Press the stick against the edge of one runner to make a V-shaped
indentation in the wood. With the indent resting on the runner edge, squeeze
the stick against the other runner edge at the aft mark to make a second
V-shaped indentation. Slide the stick to the marks on the forward end of
the runners to check the difference in distance between the fore and aft
edges of the runners.
|

| These steps will help you to get the most out of your runners under
the widest range of sailing conditions.
Note: This article is from the Fall 1989 edition of The Boatbuilder (Number 27). The Boatbuilder is published by Gougeon Brothers Inc.
updated August 22, 1999 |
back to Articles